Building your own cloud infrastructure might sound daunting, but with Taubyte’s SporeDrive SDK, deploying a fully functional cloud to your servers takes just minutes. In this guide, we’ll walk through deploying a Taubyte cloud using infrastructure-as-code principles.
Prerequisites
Before we begin, you’ll need:
- Infrastructure: One or more servers (bare metal or VMs) running Linux with SSH access
- Domain: A fully qualified domain name with advanced DNS management capabilities
- SSH Access: SSH key access to your servers
For this guide, we’ll use two servers and the domain k8s.cyou as an example.
Getting Started with SporeDrive
SporeDrive is available as an NPM package, as well as Go and Python packages. For this demonstration, we’ll use the NPM package. Start by cloning the boilerplate repository:
git clone https://github.com/taubyte/spore-drive-boilerplate
cd spore-drive-boilerplate
npm install
The repository contains everything you need to get started, with SporeDrive listed as a dependency in package.json. The displace script in package.json is responsible for starting the deploy process to your hosts.
Configuration
Environment Setup
Copy the example environment file and configure it for your infrastructure:
cp .env.example .env
Now let’s go through each section of the .env file:
Server Configuration
The first section handles SSH access to your servers. The SSH_KEY variable points to the PEM file that contains your server’s private SSH key. You’ll need to create this file in the root folder and add your private key, then save and exit.
SSH_KEY=ssh-key.pem
The SERVERS_CSV_PATH points to the hosts CSV file that should contain your infrastructure information. We’ll create this file next.
SERVERS_CSV_PATH=hosts.csv
The SSH_USER is the username to connect to your servers. This may differ depending on your server configuration (common values are ubuntu, root, or admin).
SSH_USER=ssh-user
Domain Configuration
Next, we configure the domains. The ROOT_DOMAIN is your main domain that will be used for the Taubyte cloud infrastructure.
ROOT_DOMAIN=k8s.cyou
The GENERATED_DOMAIN is used for development and testing purposes. This subdomain will be used for generated resources.
GENERATED_DOMAIN=g.k8s.cyou
DNS Configuration (Optional)
The last section is optional. You can add your domain provider’s information (in this case, Namecheap) to automatically configure DNS records, or you can set up the DNS manually.
NAMECHEAP_API_KEY=
NAMECHEAP_IP=
NAMECHEAP_USERNAME=
If you don’t provide DNS API information, the deployment will skip the DNS configuration step and you’ll need to configure the records manually.
Hosts Configuration
After creating your .env file and SSH key, create a hosts.csv file in the root directory listing your servers. The CSV should contain the hostname and public IP of each host you are using:
hostname,public_ip
node1.k8s.cyou,203.0.113.1
node2.k8s.cyou,203.0.113.2
Understanding the Code
The main deployment logic lives in src/index.ts. The source folder also contains helper files:
csv.ts: A helper for extracting hosts from the CSV file we created earlier. It gets the hostname and public IP of each host and returns them as records.namecheap.ts: The Namecheap DNS API client that allows for different operations on the API like setting and deleting DNS records.
Let’s examine what happens when you run the deploy script:
1. SDK Connection and Configuration Creation
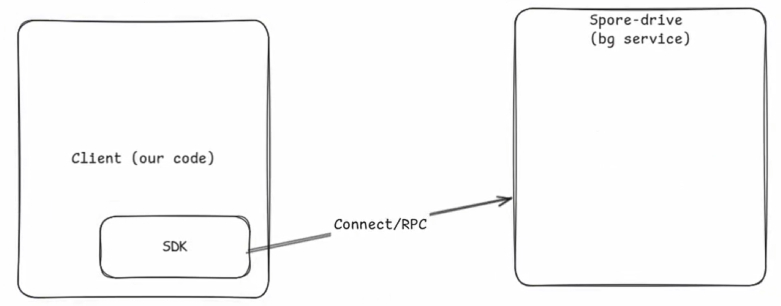
It all starts with the SDK connecting to the SporeDrive background service using RPC when we run our NPM displace script. At the top, we have all our imports including our specific SDK ones like the Config and Drive objects:
import {
  Config,
  CourseConfig,
  Drive,
  TauLatest,
  TauPath,
  Course,
} from "@taubyte/spore-drive";
import fs from "fs";
import dotenv from "dotenv";

// Load .env file at the start
dotenv.config();

import { getServersFromCSV } from "./csv";
import NamecheapDnsClient from "./namecheap";
It all starts with the SDK connecting to the SporeDrive background service using RPC when we run our NPM displace script:
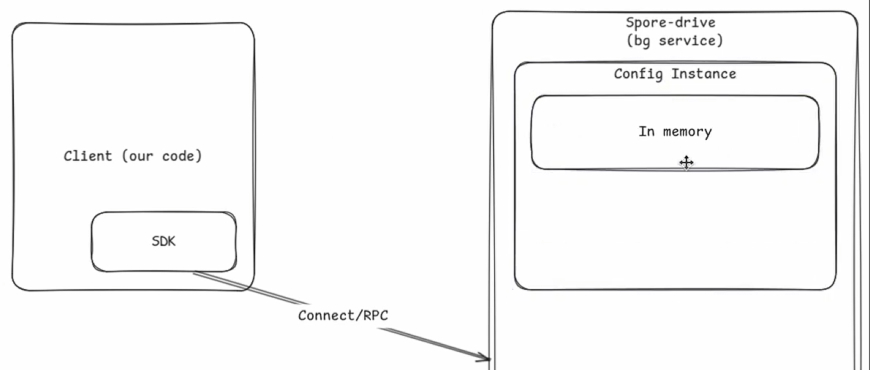
The background service uses the Config object imported to create and initialize an empty config instance. This config instance can be in memory by default or written to disk at will:
const configPath = `${__dirname}/../config`;

// Ensure config directory exists
if (!existsSync(configPath)) {
  mkdirSync(configPath, { recursive: true });
}

const config: Config = new Config(configPath);

await config.init();
2. Domain and Security Setup
The createConfig function accepts the config instance and starts by setting the root and generated domains to the empty config using environment variables we set up earlier:
export const createConfig = async (config: Config) => {
  await config
    .cloud.domain.root.set(process.env.ROOT_DOMAIN || "pom.ac");
  await config
    .cloud.domain.generated.set(process.env.GENERATED_DOMAIN || "g.pom.ac");
It checks for domain validation and swarm keys and generates them if they don’t exist:
  try {
    await config.cloud.domain.validation.keys.data.privateKey.get();
  } catch {
    await config.cloud.domain.validation.generate();
  }

  try {
    await config.cloud.p2p.swarm.key.data.get();
  } catch {
    await config.cloud.p2p.swarm.generate();
  }
3. SSH Authentication Setup
Following that, it uses the SSH user environment variable and the private key file to establish an SSH connection to our hosts:
  // using SSH key for authentication
  const mainAuth = config.auth.signer["main"];
  await mainAuth.username.set(process.env.SSH_USER || "ssh-user");
  const sshkey = await fs.promises.readFile(process.env.SSH_KEY || "ssh-key.pem");
  await mainAuth.key.path.set("keys/ssh-key.pem");
  await mainAuth.key.data.set(sshkey);
4. Shape Definition
It then creates a shape and calls it “all”. The shape is the number of services used in a single node. In this case, we are using all the available Taubyte cloud services in each node, and adding them to the shape, hence the name “all”. It continues with setting up the main and lite ports for the services and attaching them to the shape:
  const all = config.shapes.get("all");
  await all
    .services
    .set(["auth", "tns", "hoarder", "seer", "substrate", "patrick", "monkey"]);
  await all.ports.port["main"].set(4242);
  await all.ports.port["lite"].set(4262);
5. Host Configuration
It then lists the hosts from the config we passed to the hosts variable, and since the config is new, the hosts are empty. Then it creates a bootstrappers empty array:
  const hosts = await config.hosts.list();
  const bootstrapers = [];
After that, it gets the servers using the getServersFromCSV function from the csv.ts helper file. It iterates through them and extracts the hostname and public IP of each:
  for (const server of getServersFromCSV()) {
    const { hostname, publicIp } = server;
If the current host is not included in the hosts list, it adds it to the hosts and the bootstrappers array. It sets addresses and locations from the current loop iteration server to the added host, checks if the added host includes the “all” shape, and if not, it generates it:
    if (!hosts.includes(hostname)) {
      const host = config.hosts.get(hostname);
      bootstrapers.push(hostname);

      await host.addresses.add([`${publicIp}/32`]);
      await host.ssh.address.set(`${publicIp}:22`);
      await host.ssh.auth.add(["main"]);
      await host.location.set("40.730610, -73.935242");
      if (!(await host.shapes.list()).includes("all"))
        await host.shapes.get("all").generate();
    }
  }
All that is left after the loop goes through all the servers is to add the bootstrapper array as nodes for node discovery, and it commits the changes to the config:
  await config.cloud.p2p.bootstrap.shape["all"].nodes.add(bootstrapers);

  await config.commit();
};
6. Drive Creation and Deployment
After creating the config, the background service creates a drive using the config and the build of Tau. By default, it uses the latest build, but you can change it to your specific one by providing a path using TauPath:
// Use TauPath("path/to/tau") if you'd like to deploy your own build of tau
const drive: Drive = new Drive(config, TauLatest);

await drive.init();
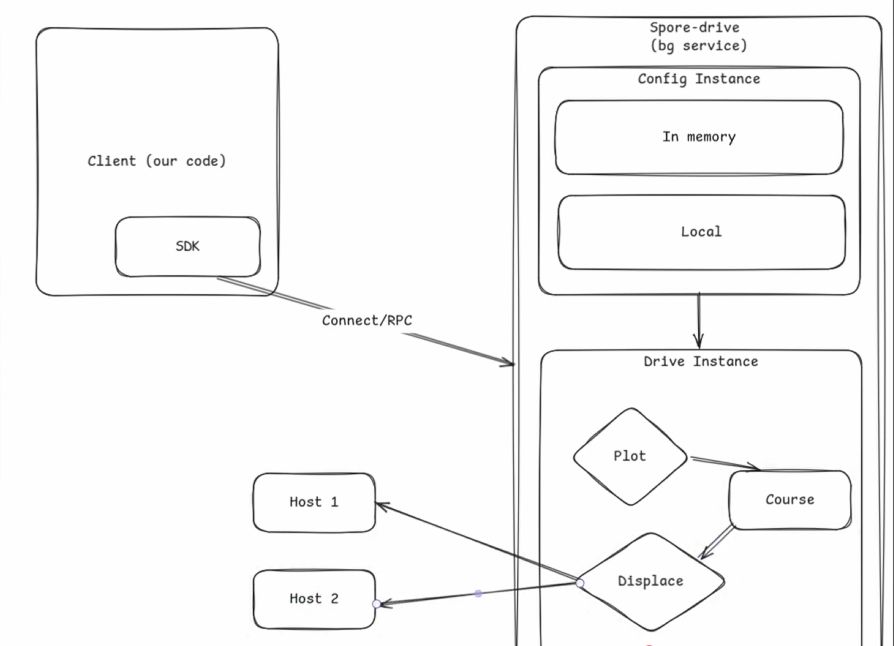
It initializes the drive and plots a new course using the shape:
const course = await drive.plot(new CourseConfig(["all"]));
Finally, it uses the keys and the displace script to deploy the Taubyte cloud to your nodes. Whilst doing that, it uses the displayProgress function, which creates a progress bar for each host to visualize the operation progress (optional and not mandatory):
console.log("Displacement...");
try {
  await course.displace();
  await displayProgress(course);
  console.log("[Done] Displacement");
} catch (e) {
  console.log("Error displacing course:", e);
  process.exit(1);
}
7. DNS Configuration
After the displacement, if you provided the DNS API information in the environment variables, it sets up the DNS with an A record for seer hosts that point to all the IP addresses of your nodes separately, an NS record for tau host that points to seer.your-root-domain, and finally, a wildcard CNAME record followed by your generated domain that points to substrate.tau.your-root-domain:
console.log("Update DNS Records...");
try {
  if (await fixDNS(config)) console.log("[Done] DNS Records");
  else console.log("[Skip] DNS Records");
} catch (e) {
  console.log("Error updating DNS records:", e);
  process.exit(2);
}
If you don’t provide any DNS API information, it skips the operation.
Running the Deployment
Execute the deploy script:
npm run displace
SporeDrive will display progress bars for each host as it configures and deploys the Taubyte services.
DNS Configuration
After deployment, SporeDrive can automatically configure your DNS (if you provided API credentials). It creates:
| Type | Host | Value |
|---|---|---|
| A | seer | 203.0.113.1 |
| A | seer | 203.0.113.2 |
| NS | tau | seer |
| CNAME | *.g.k8s.cyou | substrate.tau.k8s.cyou |
If you don’t provide DNS API credentials, you’ll need to configure these records manually with your DNS provider.
Verifying Your Cloud
Console Access
Navigate to console.taubyte.com and:
- Enter your email
- Input your root domain (e.g.,
k8s.cyou) - If the domain is accepted, your DNS is configured correctly
Create Your First Project
Once logged in, you’ll see the project management interface:
- Click Create Project
- Enter a project name
- Set visibility (public/private)
- Click Create
This creates two GitHub repositories: one for configuration (YAML files) and one for your code.
Deploy a Test Function
Let’s verify everything works by deploying a simple function:
- Navigate to Functions in the sidebar
- Click the + button
- Select a template (e.g., Go ping/pong)
- Configure the domain and save
- Push your changes to GitHub
The build will trigger automatically. Once complete, click the lightning icon next to your function to test it.
# You should see:
PONG
Architecture Overview
Here’s what you’ve just deployed:
┌─────────────────────────────────────────────────────────────┐
│                     Your Taubyte Cloud                      │
├─────────────────────────────────────────────────────────────┤
│  Node 1 (203.0.113.1)        │  Node 2 (203.0.113.2)        │
│  ├── auth                    │  ├── auth                    │
│  ├── tns                     │  ├── tns                     │
│  ├── seer (DNS)              │  ├── seer (DNS)              │
│  ├── patrick (CI/CD)         │  ├── patrick (CI/CD)         │
│  ├── monkey (Build)          │  ├── monkey (Build)          │
│  ├── hoarder (Replication)   │  ├── hoarder (Replication)   │
│  └── substrate (Runtime)     │  └── substrate (Runtime)     │
├─────────────────────────────────────────────────────────────┤
│                   Peer-to-Peer Network                      │
│              (Secure, encrypted communication)              │
└─────────────────────────────────────────────────────────────┘
What’s Next?
With your Taubyte cloud deployed, you can:
- Deploy serverless functions in Go, Rust, or AssemblyScript
- Host static websites with automatic SSL certificates
- Create databases with automatic replication
- Set up storage buckets for object storage
- Implement pub/sub messaging for real-time applications
Troubleshooting
DNS not resolving?
- DNS propagation can take up to 48 hours
- Use
digor slimdig.com to verify records
SSH connection failing?
- Verify your SSH key permissions:
chmod 600 ssh-key.pem - Confirm the SSH username matches your server configuration
Console not accepting domain?
- Ensure the
seer.tau.k8s.cyouNS record is properly configured - Wait for DNS propagation and try again
Conclusion
You’ve just deployed your own cloud infrastructure capable of competing with major cloud providers. With SporeDrive, the entire process is codified, reproducible, and takes just minutes instead of months of engineering effort.
The infrastructure you’ve created supports serverless functions, static websites, databases, storage, and real-time messaging—all running on your own hardware with complete control over your data.
For more advanced configurations and detailed documentation, visit tau.how. Join our Discord community if you have questions or want to share what you’re building.
Next: Run a cloud locally with Dream to start developing, or create your first project to begin building.